The Ultimate Overview to Gizmo Repair Work: Navigating Display Fixing and Mastering Motherboard Repair Service
You don't have to count only on specialists for fixings. Allow's check out the fundamentals of gadget repair work together.
Understanding Common Gizmo Concerns
When you depend on devices for daily jobs, it's irritating when they start acting up. Often, these concerns stem from software glitches or obsolete applications.
Screen problems like flickering or unresponsiveness can arise from physical damages or software issues. Recognizing these usual concerns encourages you to fix successfully and recover your device's performance.
Tools You'll Need for Display and Motherboard Fixing
Once you have actually recognized concerns like display flickering or unresponsiveness, having the right tools available makes all the difference in fixing your gizmos. Initially, get a precision screwdriver collection, as various tools need various screw types. A plastic spudger is crucial for prying open screens without destructive fragile components. Don't neglect tweezers for taking care of little parts and screws.
For screen repair work, a heat weapon or hairdryer can assist soften adhesive, allowing you to divide elements easily. If you're delving into motherboard repair work, a multimeter is essential for identifying electrical problems.
Lastly, purchase an anti-static wrist strap to secure sensitive electronic devices from fixed power. With these tools, you'll be well-equipped to deal with both display and motherboard repair work with confidence.
Step-by-Step Guide to Screen Fixing
To effectively fix a screen, beginning by gathering your tools and preparing the work space. You'll need a screwdriver collection, a plastic pry device, and a brand-new screen. Ensure your location is clean and well-lit.
Utilize the screwdriver to very carefully separate the screws holding the screen in location. Carefully put the pry tool in between the display and the device framework to pop it loosened.
As soon as the screen is free, detach the cable by delicately lifting it from its port. Currently, take the brand-new display and attach it to the tool, guaranteeing it's firmly in position.
Very carefully straighten the display with the tool structure, press it down, and change the screws. Power it on to check your job. You have actually simply finished an effective display repair!
Troubleshooting Common Screen Problems
Although you've just finished a screen repair work, you might still encounter some common issues that can impact its efficiency. If you detect them, it can be an indicator of a damaged link or a malfunctioning display.
If your screen has a yellow color, it could be a software application issue or a calibration trouble. Consider readjusting the setups in your screen preferences. Additionally, if touch level of sensitivity seems off, rectify the screen or look for any kind of debris around the sides.
Finally, if the display screen is less competent, perform a tough reset on your device. If troubles continue after these repairing actions, you might need to revisit your repair or look for professional assistance. Remember, recognizing the issue early can conserve you effort and time down the line.
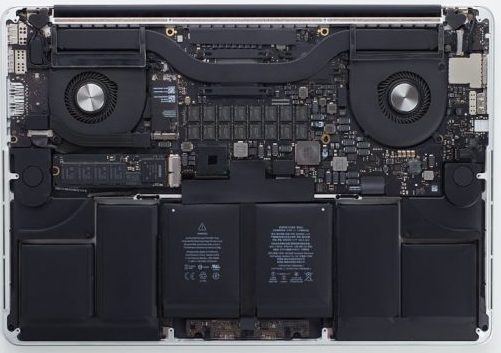
Understanding Motherboard Repair: Trick Techniques
When dealing with motherboard fixings, having the right devices is vital to your success. You'll commonly run into usual issues that can be fixed with a clear step-by-step process. Let's explore these techniques to assist you grasp the art of motherboard repair work.
Important Tools Called For
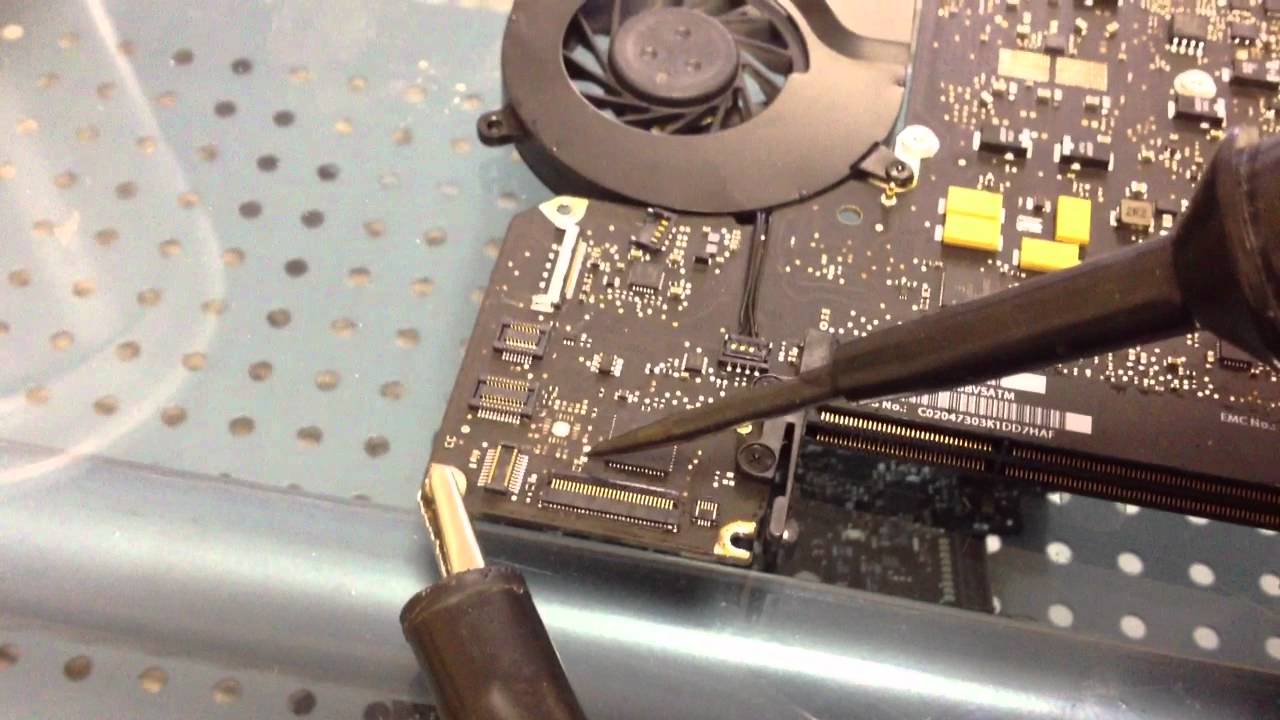
While you might believe that fixing a motherboard learn this here now requires specialized abilities, having the right devices can make the process much a lot more manageable. A soldering iron is necessary for any component replacements or fixings, so invest in a great one. With these devices, you're well-appointed to engage in motherboard repair service with confidence.
Common Problems Recognized
Several typical concerns can emerge with motherboards that every repair work lover need to recognize. First, you might come across power failings due to defective capacitors or harmed traces. If your tool won't switch on, look for burned components or loosened links. Next off, overheating can stem from inadequate air conditioning solutions or dust buildup, which can lead to performance issues. You ought to also view out for short circuits, typically triggered by fluid spills or incorrect handling. Furthermore, BIOS failings can avoid booting and might require firmware updates or resets. Component failings, such as damaged RAM ports or damaged connectors, can interfere with capability. By determining these problems early, you can save time and boost your fixing abilities.
Step-by-Step Repair Work Process
Determining usual motherboard issues is just the very first action; recognizing how to tackle repair services is where your abilities absolutely shine. After reassembling, power up the gadget to check your repair. Keep in mind, practice enhances your abilities, so maintain trying out with different repair services.
Diagnosing Motherboard Concerns
Just how can you inform if your motherboard is causing problems? Begin by observing any kind of uncommon actions in your gizmo. If it will not start up or regularly collisions, that's a red flag. Pay interest to any type of mistake messages; these can provide hints regarding hardware failures. If you discover unusual noises, like beeping during start-up, this can show motherboard troubles.
If you can, reseat the RAM and various other ports, as loose links can imitate motherboard issues. Making use of analysis tools like Blog post cards can assist pinpoint the trouble, as well.
If your gadget still will not respond after these checks, it's time to contemplate specialist evaluation or substitute. Keep in mind, identifying motherboard issues can be tricky, yet careful observation and systematic checks will direct you to the best final thought.
Safety Nets to Extend Gizmo Life Expectancy
After addressing prospective motherboard concerns, it's just as important to concentrate on safety nets that can help expand your gadget's life expectancy. Beginning by keeping go to my blog your tool clean; dirt and particles can clog vents and create overheating. Utilize a microfiber towel to wipe the screen and instance frequently.
Following, buy a high quality instance or screen protector. These can protect your gizmo from unintentional decreases and scrapes, preserving its condition.
Furthermore, stay clear of exposing your gadget to severe temperature levels and moisture. Keep it in a great, completely dry place, and don't leave it in a warm vehicle.
Finally, look here consistently update software and apps - MacBook screen and Motherboard repairs in South Africa. Updates commonly consist of safety and security spots that protect against vulnerabilities
Often Asked Inquiries
Just How Much Does Specialist Gizmo Repair Usually Expense?
Expert device repair service prices generally vary from $50 to $300, relying on the tool and the concern. It's clever to contrast rates and check out evaluations to ensure you're obtaining high quality service for your money.
Can I Repair My Gizmo Without Previous Experience?
Yes, you can fix your device without previous experience! Begin with easy solutions, watch tutorials, and gather the right devices. With perseverance and technique, you'll get self-confidence and enhance your skills in time.
What Are the Risks of Do It Yourself Gizmo Fixing?
When you try DIY device repair service, you run the risk of harmful your device better, invalidating guarantees, or hurting yourself. It's vital to weigh these threats versus your confidence and ability level before diving right into repair work.
Just how Do I Discover Trustworthy Repair Service Services in My Location?

What Warranty Options Exist for Repaired Gadgets?
When seeking guarantee alternatives on fixed gizmos, you'll frequently locate selections like limited warranties, fulfillment warranties, or expanded insurance coverage. Constantly ask your repair service about their details plans to assure you're safeguarded.